Genshin 7.0's two new artifact sets, explained
By DayOneFix Editorial · August 13, 2026
Version 7.0 shipped two artifact sets built for Stellar Glimmer reactions, and they are not interchangeable: one is a party buff, the other is personal damage. Both come from the same domain, so the real decision is which one your team needs first.
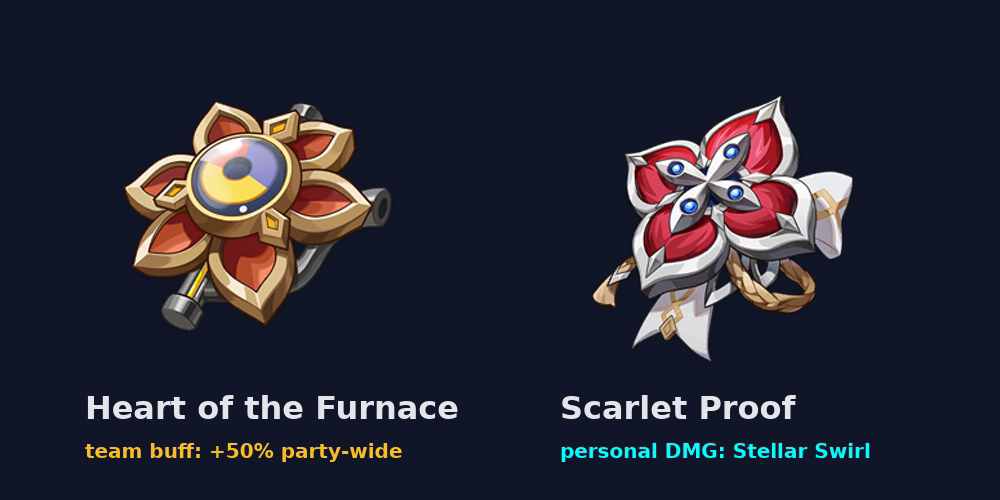
Where both sets drop
Domain of Blessing “Inverted Glacier”, in Everfrozen Earth, Snezhnaya — one domain, both sets, exactly like every recent pair. (Exact route from the nearest waypoint, and when to stop farming: the domain page.) From this Spiral Abyss cycle onward, the Ley Line rewards on Floors 9–12 also hand out these two sets in place of Disenchantment in Deep Shadow and Celestial Gift, so Abyss runs feed the same farm.
Heart of the Furnace — the teamwide engine
Official effects, straight from the game data:
| 2-piece | ATK +18% |
| 4-piece | On triggering a Stellar Glimmer reaction or dealing Stellar Glimmer reaction DMG: +12% ATK to the wearer for 12s, and +50% Stellar Glimmer reaction DMG to all nearby party members. Works off-field. Same-name sets do not stack across the party. |
Two things that get misreported elsewhere and matter for how you build:
- The 4-piece is not only the famous +50% party buff — it also feeds the wearer 12% ATK, which is why it suits a character who wants ATK anyway rather than a pure buffbot.
- “Do not stack” means one wearer only. A second Furnace user adds nothing to the party bonus, so the correct move is one carrier plus different sets on everyone else.
Who wears it: Odette first — CN guides are specific about why. She triggers the set’s condition from the backline, and stacked with her own talent’s 60% Stellar buff the party’s total Stellar Glimmer bonus approaches ~124%. The Cryo Traveler can wear it, but does not apply Cryo from off-field, so they must swap in and charged-attack to trigger it — fine in a quick-swap rotation, awkward otherwise.
The set is not locked to Stellar-system characters, which CN coverage flags as its real strength: any off-field character on a team that triggers Stellar reactions — including old supports — can hold it and buff the party.
Piece names, if you are checking your inventory: Foundryman’s Conjecture (flower), Foundryman’s Observation (plume), Foundryman’s Calculus (sands), Foundryman’s Magnanimity (goblet), Foundryman’s Legacy (circlet).
Scarlet Proof — personal Stellar Swirl damage
| 2-piece | ATK +18% |
| 4-piece | For 10s after triggering Stellar Swirl: +16% CRIT Rate and +40% Stellar Swirl DMG to the wearer |
This one is narrower on purpose: it only rewards Stellar Swirl (Cryo + Anemo), not the Stellar-Conduct half of the system, and everything it gives is personal. That makes it an Anemo damage-dealer’s set — the character actually triggering the swirls — not a support piece.
CN guides name Yumemizuki Mizuki as the standout fit, because she converts Cryo-Anemo reactions into Stellar Swirl directly. Beyond her, any Anemo carry works as long as Odette is enabling the conversion — Varka, Venti, Wanderer and Xiao are all named as viable wearers, which is unusual for a set built around a brand-new mechanic.
The crit rate matters more than it looks: 16% is roughly a crit circlet’s worth, which frees your circlet slot for CRIT DMG and changes what substats you need.
Piece names: Honor to Your Devotion, Glory to Your Legacy, Time Gifted Unto You, Chalice of Your Blood and Sorrow, Testament to Your Faith.
Which to farm first
- Running any Stellar team: Furnace first. A single 4-piece raises the whole party’s Stellar Glimmer damage by 50% — nothing else in 7.0 is that efficient per artifact farmed.
- Building an Anemo carry around Stellar Swirl: Scarlet Proof, but only after your trigger unit is stable; the set does nothing if swirls are inconsistent.
- Everyone else: neither. If your team can’t convert Superconduct and Swirl into their Stellar versions, both sets are dead stats — that conversion needs Odette or the Cryo Traveler in the party.
Main stats follow the usual rules: ATK / ATK / crit for the Furnace carrier, ATK / Anemo DMG / crit for a Scarlet Proof carry.
FAQ
What are the two new artifact sets in Genshin 7.0? Heart of the Furnace, the teamwide Stellar Glimmer engine (+50% Stellar Glimmer reaction DMG to all nearby party members, works off-field), and Scarlet Proof, the personal Stellar Swirl damage set (+16% CRIT Rate and +40% Stellar Swirl DMG to the wearer).
Where do the 7.0 artifact sets drop? Both come from the Domain of Blessing “Inverted Glacier” in Everfrozen Earth, Snezhnaya. From this Spiral Abyss cycle onward, the Ley Line rewards on Floors 9–12 also hand out these two sets.
Who should wear Heart of the Furnace? Odette first — she triggers the set’s condition from the backline, and stacked with her own talent’s 60% Stellar buff the party’s total bonus approaches ~124%. Only one wearer per party: same-name set bonuses do not stack.
Who should wear Scarlet Proof? Yumemizuki Mizuki is the standout fit; beyond her, any Anemo carry works as long as Odette is enabling the conversion — Varka, Venti, Wanderer and Xiao are all named as viable wearers.
Which set should you farm first? Furnace if you run any Stellar team — a single 4-piece raises the whole party’s Stellar Glimmer damage by 50%. Neither, if your team can’t convert Superconduct and Swirl into their Stellar versions: that conversion needs Odette or the Cryo Traveler in the party.
Related
- Odette explained — the first Furnace carrier
- Cryo Traveler build — which set fits which team
- Alyosha build — the Furnace stacking trap
- Stellar Glimmer reactions, explained
Sources
Set effects and piece names are from the official Genshin Impact wiki data (HoYoWiki entries 11223 and 11222); the domain location and the Spiral Abyss reward swap are from the official Version 7.0 update notes. Who-wears-what, the ~124% stacked figure and the farming priority come from Chinese launch guides (新提瓦特小小助手, 新提瓦特小助手, 原魔游研社), labelled as launch consensus rather than official values.